John in Philly has commented quite a few times, and we've run into each other around the net-world on occasion.
He mentioned some work he had done, and then sent a blog worthy run down to me via email. With pictures, yet!
I asked permission to repost and here it is, for your enjoyment:
The Lampshade project.
Cast of characters.:
Me. John
Wife. Best Wife Ever.
Background.
Best Wife Ever
bought a Baldwin Brass Company floor lamp a bunch of years ago, and the
shade had once again aged out and needed to be replaced. The
last time this happened we took it to a small backstreet lamp and shade
repair store and they stripped the shade frame and recovered it.
Time passed, and the shade aged out again and the cloth became brittle.
But the employee that overhauls the shades had retired without a replacement.
The owner of the store and
Best Wife Ever
worked together and agreed on a replacement shade of the same quality. We bring the shade home, and
Best Wife Ever
begins to install it. But the lampshade retention system used by Baldwin turns out to be a different size than the normal.
The new shade won't fit and
Best Wife Ever
wants to use the new shade because she likes it. What to do?
If only we had a small machine shop in the basement. Wait! We do have a small machine shop in the basement.
All
I have to do is to take some measurements, do a bit of math, and then
machine an adapter so that Best Wife Ever can use the shade she likes. And
since the lamp is now using LEDs or compact fluorescent bulbs, I can
machine the adapter from PVC because heat isn't an issue.
I
mentally sketch what I need, dig through the leftover PVC fittings,
find what I need to start, and begin figuring out the tooling and
sizes.I plan on making a screw together gizmo that will go
over the three arms of the shade, and the brass finial that functions to
hold the shade in place will screw into my gizmo.
I will need to turn some ODs, cut two internal threads, and one external thread.
OK. This will be my first ever internal thread and I've had that lathe for a little more than 20 years.
The thread count is 20 tpi and I need an internal threading bar. I
find that I don't have an internal threading bar, but I do find
something I can use in my shoebox of hand-me-down tool bits I got from
my machinist father.I can use this to make it work, and when I
can use a tool that my father made with his own hands, I can literally
feel the connection to him.
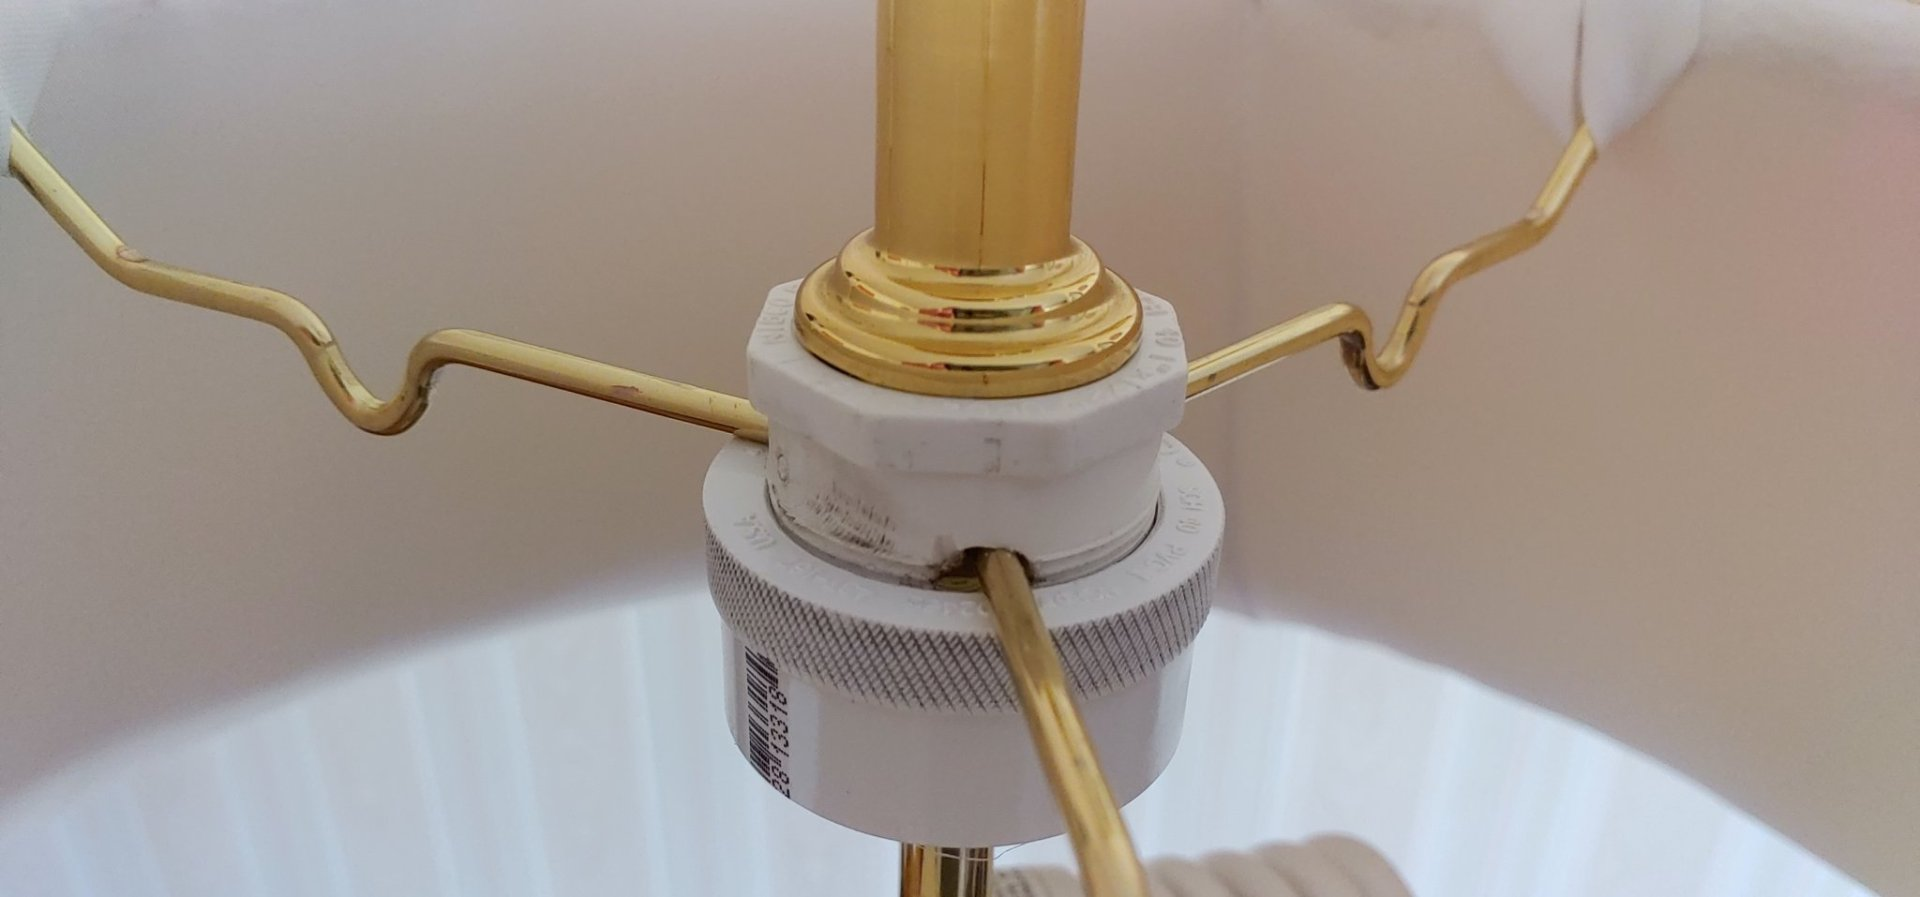
This is the brass finial that won't fit on the new shade.
This is not the shade, but shows how the center ring
should fit up into the finial, and then the knurled ring will push the
triple arms up the slots.
But the new shade has a center ring that is larger than the original and will not fit up into the brass finial.
There isn't enough metal to bore the hole larger. After
some time at the lathe, and a trip to get a PCV piping adapter sized to
make the knurled ring, I have completed the adapter.
No wires were used to check the thread sizing. I used the technique of cutting the threads until the parts fit together. I was getting ready to part off the PVC knurled ring, and I realized that plastic is way weaker than metal, so I left it long.
Best Wife Ever
is happy and I got more learning on single point thread cutting, and using the change gears.
The
most interesting part was when I was cutting the internal threads for
the knurled ring and I needed to figure out what size to bore out the ID
before I started cutting the threads. The threading charts lacked information on what I determined to be 1.33" X 20 tpi internal threads. I spent some time reading up on the subject, then did the math for 20 tpi thread depth and it all worked out.
Adapter and shade before adding the finial to it.
Yes, there's a shoulder in there.
John in Philly.
Here is a quick tutorial on internal threading by Professor Pete
All in all, a successful project, and a happy missus. Win - win!!
Thanks for letting me post this, John. Job well done!
TB. Thank you. One of my earliest memories is when I was helping my Dad fix something at home. He was drilling something on the drill press and the help was for me to squirt oil from one of those squeeze lever oil cans.
Well TB, I haven't been able to curb my curiosity. And John mentioned something that I had to know more about. And it was good. I didn't want to hoard it all to meself!


Very cool!
ReplyDeleteNice work around too.
Phil. Thank you. I enjoyed the learning, Best Wife Ever is happy and I got some new tools. :)
ReplyDeleteI got to get my "Best Wife" a floor lamp.💑
ReplyDeleteSpartan-C. And a metal working lathe.
DeleteJohn, if you even knew.
DeleteWow STxAR! You are fancy - guest blogger, you sly devil.
ReplyDeleteJohn - Well done. I am truly always amazed at what knowledgeable people can do (as I have virtually no skills in this area).
TB. Thank you. One of my earliest memories is when I was helping my Dad fix something at home.
DeleteHe was drilling something on the drill press and the help was for me to squirt oil from one of those squeeze lever oil cans.
Well TB, I haven't been able to curb my curiosity. And John mentioned something that I had to know more about. And it was good. I didn't want to hoard it all to meself!
DeleteThis comment has been removed by a blog administrator.
ReplyDelete